Sex Addiction versus Love Addiction: Are they Fundamentally Different or the Same?


Both sex addiction and love addiction are understood to be disorders of emotional intimacy characterized by obsessive thoughts and compulsive acting out behaviors. The difference between these addictions lies specifically in the types of acting out behaviors which may be present. A sex addict may have a problem with pornography or repeated anonymous sexual experiences, while the love addict acts out in relationship-by clinging to a partner (sometimes one who is destructive to him or her), by avoiding love and/or intimacy with a partner, by moving from one relationship to the next, and/or by not being able to cope when a relationship ends.


Sexual Addiction


In 1983, with the help of an addiction treatment center called the Hazeldon Foundation, Patrick Carnes published his seminal work, Out of the Shadows: Understanding Sexual Addiction. Since that time, many therapies have been devised and many more treatment centers have opened their doors to those suffering sexual addiction. "Hypersexual disorder" is how the American Psychiatric Association (APA) and its publication, the Diagnostic and Statistical Manual of Psychiatric Disorders (DSM), propose to term the disorder. Still, to date, there is no APA supported diagnosis for sexual addiction, although many APA affiliated therapists and recovery centers treat individuals who experience both sex and love addiction symptoms.

A sex addict is someone who experiences life disruption or dysfunction due to habitual sexual obsessions and compulsions. Both men and women experience sexual addiction. A sex addict may compulsively look at pornography; may engage in compulsive masturbation; may engage in sex for pay activities (via phone, internet, or in person); may engage in compulsive voyeurism or exhibitionism; may seek repeated anonymous sexual encounters; or may feel unable to stop behaviors which lead to repeated infidelity. Sexual addiction is often progressive, meaning the compulsive acting out behaviors become progressively worse over time. A person engages in sex to "numb out" or feel a high in order to escape problems or avoid intimacy, but the consequences of shame, guilt, or broken relationships incite more and greater acting out behaviors.


Love Addiction


A love addict is someone who experiences an intoxicating rush when engaged in seduction; "romantic intrigue" (the initial phase of a relationship characterized by intense infatuation and increased sexual interaction); lust; or is someone who has a pattern of intense, painful, or obsessive relationships; or who is clinging, desperate, and insecure in a current relationship. A love addict may also be someone who is love-averse or "love avoidant" (incapable of lasting feelings of attachment) but who is either addicted to a pattern of usually unsuccessful relationships, or who has what is termed "emotional anorexia" and may avoid relationship or commitment altogether.

Chemicals behind Both Addictions


When a love addict ends a relationship, and when a sex addict goes without sex or sexual acting out behaviors, both may experience withdrawal symptoms. The withdrawal symptoms may include: depression, uneasiness, anxiety, restlessness, or irritability.

When a baby is held and petted, as well as when a mother breastfeeds and coos to her baby, the bond is reinforced by a chemical reaction in the brain. Oxytocin, dopamine, and endorphins flood the brain and bloodstream. These chemicals send a pleasant sensation through the mother and child and trigger the reward center of the brain, reinforcing this ancient act of caregiving. Likewise, when a drug addict injects a hit of heroin, this same reward center is tripped. It is this same reward center that is activated when we have sex, feel close to our lovers, or simply feel excited about the possibility of seeing them-oxytocin floods our system and elevates our mood. It is this chemical reaction people are addicted to; the method is different for everyone.

The 12-Step program established to support these addictions often refers to an overall addiction-sex, love, and relationship addiction-and has a program called Sex and Love Addicts Anonymous to support people who may feel they are suffering from one or all addictions under the umbrella. Since the basic problem of sex and love addiction is one of emotional intimacy, and because this problem may be rooted in how attachments were formed in childhood with primary caregivers, it is important to recognize that they are closely related. The same root issues may reveal themselves in different acting out behaviors, but the dysfunction is the same: it is a dysfunction of relationship. All addictive patterns create negative consequences-to an individual’s sanity, health, relationships, and work-and all require supportive efforts to be healed. Getting therapy, finding a support group, and attending local SLAA meetings are just some of the ways healing from sex and love addiction can be found.

Sex and Love Addiction


The highs of love and sex hinge on physical or psychological arousal, and relationships can be marked by desperation. However, there is some debate over whether sex addiction exists. 


Definition


For people hopelessly in love, they go through life feeling desperate longing and constant fear. That is the fear of rejection, pain, unfamiliar experiences, and having little faith in their ability or right to inspire love. They wait and wish for love, but suffer a destructive twist on a normal life-enhancing activity. 

For those who crave lots of sex, the need for arousal often replaces the need for intimacy; and the cravings can mask other issues such as depression, anxiety, and stress.

Symptoms


For the lovelorn:

  • Love is all consuming and obsessive
  • Is inhibited
  • Avoids risk or change
  • Lacks true intimacy
  • Is manipulative, strikes deals
  • Is dependent and parasitic
  • Demands the loved one's devotion


Treatments


If you are in an unhealthy relationship, you may want to seek professional assistance. Specialized counseling is available for those dealing directly or indirectly with these issues.

Treatment should probably involve at least some of the following:


  • Rebuilding relationships
  • Managing stress
  • Self-help
The creation of an environment that supports the therapeutic process is essential. A thorough assessment is conducted, and any problems or blocks to treatment are noted. The counselor begins the bonding with the client during the assessment, and then prepares a therapeutic or treatment plan (the change model) to help the client deal with any blocks that will prevent response to the treatment process.

Relieve Stress with Massage Therapy


Stress is universal, and it's not always bad. Whenever you jump to catch a badly thrown ball, feel especially energetic before an important meeting, or hit the brakes in time to avoid a car accident, stress is doing its job. The adrenaline boosting your heart rate and the colorist boosting your blood sugar, while diverting energy away from your digestive system and immune responses, are exactly what prehistoric humans needed to fight or flee attackers.

However, when there's never any relief from stress, the sustained fight-or-flight response can cause problems. In fact, Web MD warns that constant stress actually becomes "distress -- a negative stress reaction. Distress can lead to physical symptoms including headaches, upset stomach, elevated blood pressure, chest pain, and problems sleeping. Research suggests that stress also can bring on or worsen certain symptoms or diseases."


BEHAVIOR CHANGES

Angry outbursts
Drug or alcohol abuse
Over- or under-eating
Social withdrawal
Tobacco use

MOOD CHANGES

Anxiety
Irritability or anger
Lack of motivation or focus
Restlessness
Sadness or depression

BODY CHANGES

Chest pain
Fatigue
Headache
Muscle tension or pain
Sex drive
Sleep
Stomach upset
Massage Therapy and Stress

Virtually every symptom listed by the American Psychological Association can benefit from massage. Research has shown that it can lower your heart rate and blood pressure, relax your muscles and increase the production of endorphins, your body's natural "feel good" chemical. Serotonin and dopamine are also released through massage, and the result is a feeling of calm relaxation that makes chronic or habitual as well as acute or short-term stress much easier to overcome.

In fact, stress relief is one of the first benefits that come to mind when thinking of massage therapy. It's also a key component for anyone trying to achieve a healthier lifestyle. Clinical studies show that even a single 1 ½-hour session can significantly lower your heart rate, cortisol levels and insulin levels -- all of which explain why massage therapy and stress relief go hand-in-hand.

Benefits of Massage Therapy for Stress


Taking care of your body should be at the top of your priorities. By adding therapeutic massage to your routine now, you'll feel, look and simply be healthier far into the future. In fact, stress relief alone can improve your vitality and state of mind. So what better way to prep for a long, happy life than a relaxing, therapeutic massage?

If you're looking to add stress-relieving massage to your wellness program, a Massage Envy membership can be a powerful ally when combating daily pressures and anxiety. In addition to stress relief, ongoing massage therapy can reduce pain, increase energy levels and improve overall physical and mental performance. Our experienced, professional therapists at Massage Envy locations nationwide customize every massage (and stress relief) session to address your individual needs.


How to Make Your Manicure Last


Keeping your nails looking their polished best is simple. Good manicure habits will also protect the health of your nails.

Follow these seven steps and your manicure should last seven to 10 days.


1. Go Shorter.

Talons not only look dated -- they’re more likely to split, break, and may even become detached from the nail bed.
"The longer the nail is, the more it acts like a lever," says dermatology professor C. Ralph Daniel III, MD, of the University of Mississippi Medical Center. "Any kind of force can lift the nail plate upward and away from its bed."
A chic and modern length is a nail that extends ever so slightly beyond the tip of your finger.


2. Shape Them Up.

Slightly oval or rounded nails with the corners left square is the easiest shape to maintain, says Wendy Lewis, a beauty consultant and author of Beauty Secrets: The Complete Lowdown on Skin, Hair and Body Treatments.
Sculpt your nails with a fine-grade emery board. Look for one in your drugstore or beauty supply shop that has the grit marked (the higher the number, the finer the grit), and choose a grit of 280/320.
Or try a four-sided buffer, which has surfaces of varying grittiness for shaping, smoothing, buffing, and shining.
File gently in one direction. If you saw back and forth, you'll weaken the tips of your nails, and that can lead to shredding or peeling.


3. Prep Before Polish.

If you have vertical ridges on your nails, create a smooth surface by applying a ridge-filling strengthener. Or, buff away the ridges with the fine side of a four-sided buffer.
Use restraint. If you buff too aggressively, you'll make the problem worse by thinning out the nail plate. "A good rule of thumb is if you feel heat or friction, back off," says Julie Serquinia, owner of The Paint Shop Beverly Hills nail salon in Beverly Hills, Calif.
Before you apply polish, swab nails with alcohol to remove any oily residue from creams or lotions. Any trace of oil will cause the polish to lift and peel, says Nancy Reagan, owner of Bella Reina Spa in Delray Beach, Fla.


4. Skip the Soak.

Dunking your fingertips into a little bowl of liquid is a standard step in most salon manicures. But it's actually a bad idea.
Your nail beds expand when you submerge them in water, and then shrink back when they dry, causing the new coat of polish to loosen. The purpose of the water soak is to assist in softening the cuticle, but a better idea is to use a cuticle softener, Reagan says. "These do a superb job of softening the cuticle so you don't need water," she says.

5. Moisturize Your Nails Nightly.

Dehydrated nails are more likely to break and split, while moisture-starved cuticles can become ragged, leading to those unsightly pieces of dead skin called hangnails.
The most efficient way to nourish parched nail beds and cuticles is with nightly use of a cuticle oil, says Jill Weinstein, MD, an instructor of clinical dermatology at Northwestern University Feinberg School of Medicine. Keep a tube on your bedside table, suggests Weinstein, and apply a couple of drops around each nail, massaging into the cuticle. This simple step will help your manicure last longer, since brittle nails chip more easily.

6. Use a Base Coat.

Applying a base coat will help nail polish stick and wear longer.
When you move on to lacquer, keep your brush strokes to a minimum and your coats to two. The fewer strokes you use to cover your nail, the less chance of streaks, Lewis says. You'll also avoid creating the air pockets and bubbles that can be caused by thick layers of polish, Reagan says.


7. Add a Topcoat.

Defend against chips by applying polish and topcoat across the top edge of your nails. This is called a "seal."
Maintain the manicure by putting a new topcoat on the entire nail every other day.
Still, even with the best defense, chips happen. Fix chips by soaking a cotton swab in nail-polish remover and dabbing it on and around the scratch or nick to even out the surface, Serquinia says. Apply a thin coat of nail polish and follow with a topcoat.

Top 10 Hair Care Tips


32 Makeup Tips That Nobody Told You About


With a few tips and tricks, you don’t have to be a professional to have fabulous looking makeup. It has taken me years to learn my face shape, what colors flatter me, how much to apply, and how to apply it so that it looks beautiful and natural. But, I think I’ve finally perfected my morning routine!
You don’t have to spend hours doing it, either. Once you have the know-how, you’ll see just how much makeup can accentuate your best features and hide those that aren’t as favorable. Here are a few makeup tips and tricks that you’ll wish you had known a long, long time ago!
1. Repurposed Plastic Spoon
Use a plastic spoon to easily apply mascara on your bottom lashes without getting any on the skin under your eyes. It also helps you to accomplish a much thicker coat. Or, if you find your under eyes to be a complete mess after applying eyeshadow and mascara, try these shadow shields!


2. Blush For Your Face Type


In order to apply blush where it will be most flattering on you, first determine your face shape. Blush not only adds color, but also contours and defines your cheek bones. The way you apply your blush can accentuate your best features and also soften those that are perhaps too prominent.


3. Scotch Tape Eye Stencil

This unconventional beauty aid will help guide you when applying eye liner and shadows, especially if you’re going for a more daring look such as the “cat eye”. It will also help you achieve an even and balanced look for both eyes. 


4. Disguising Under Eye Bags

Most of us tend to just sweep a layer of concealer to the entire under eye area, but to really conceal bags, it’s best to highlight the crease and then apply a darker shade to the actual puffy area.


5. Eye Highlights

The placement of highlights is very important when trying to create naturally beautiful eye makeup. Your lighter colors (whites, creams, and pearls) should be applied to the inner corners, the middle of the eye, and just under your brow bone. Apply your lightest colors first, and then move on to your darker shades.


6. How To Fix Clumpy Mascara

Let’s face it, this happens to every tube of mascara over time. The problem is it dries out and then starts to form unattractive lumps. To help prevent this, don’t pump your mascara trying to get more on your wand; you’re basically pumping air into the tube causing it to dry out even faster.
Although mascara should be replaced every 3 to 4 months, I used to replace mine much sooner just because it dries out so fast and creates undesirable results. But, there’s an easy fix for that! Add a drop or two of Visine (or any brand of eye drops) into the tube, and then rub the wand around inside. The Visine softens the mascara liquid, making it apply as if it were a brand new tube!


7. Lipstick Ready

Use a baby toothbrush to exfoliate your lips. To really get the job done, you can make a homemade lip exfoliate with sugar, honey and coconut oil, or easier but not as effective, cover your lips in lip balm or petroleum jelly before scrubbing.


8. Make The Best Of Your Eye Shape

As important as your color choices are, the placement of your shadows and liners is just as critical; you can create just about any illusion that you want. With careful placement, you can make your eyes appear wider, closer set, more prominent, deeper set, etc. Determine what shape of eyes you have, and then accentuate them accordingly.


9. Make Eyes Appear Bigger

If you don’t already own a nude pencil, invest in one now just for this simple trick! Instead of lining your water line with dark eyeliner, use a nude pencil to create the illusion of a bigger eye. If you squint your eyes a little at this picture comparison, you’ll see what a difference it really makes. A white liner also works well if you are really fair-skinned.


10. Tightlining

What is tightlining? It’s a way of applying your liner right in between your lashes. This is a great way to appear as though you’re not wearing any makeup at all, yet adding a little bit of color and definition to your eyes, and making the base of your lashes appear thicker.


11. Make Eyeshadows Pop

Have you ever purchased a vibrant color of shadow that once applied appears rather dull? The key to making those colors pop is a white base. Use a white eyeliner and cover your entire lid before applying the color of your choice.


12. The False Eyelash Look

False lashes can be a pain, not to mention time consuming! Here are a few ways to get the look without the hassle:
1. After curling your lashes, apply a thin layer of powder before applying your mascara. I just sweep a small blending brush across my compact and apply it to the top and bottom of my eyelashes. I’ve also heard that some people use baby powder, although I think they both have virtually the same effect; creating a base that makes them appear much fuller.
2. Apply two coats of mascara to the bottom and TOP side of your lashes, but wait 3-5 minutes in between each coat, otherwise they tend to get clumpy (not cute).
3. When applying your mascara, you don’t want to just move your mascara wand from the base of your lashes up. Make sure you are moving the mascara wand back and forth while going up. The left and right motion will make sure every lash is covered entirely, all the way to the tip.
4. Almost done! Now, check your lashes for any gaps. Use the tip of your wand to apply another coat of mascara to individual lashes where they look sparse. Even better, use a fine tipped liquid eyeliner to fine tune and fill in any gaps.


13. Lash Curling Secret

Get the most out of your lash curler by pinching at the very base of  your lashes, and then lifting the curler up into an inverted position. This creates double the curl and lasts much longer!


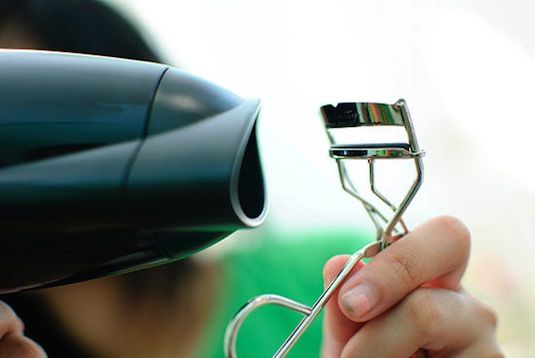
14. Heat Your Lash Curler

Hold a blow dryer up next to your lash curler for about 3-5 seconds. The heat works the same way as it does with your curling iron, giving you those flirty lashes that will last all day.


15. The Perfect Match

This is the one thing that no matter how well it’s applied, if it’s the wrong color, it will look terrible! We all dread that our foundation will give us a ghost face or even worse, that dreaded orange jaw line. Because your neck isn’t exposed to the sun as much as your face, it is much better for matching your true color.


16. Business Card Trick

When applying mascara, hold a business card behind your lashes and apply it in a back and forth motion starting at the roots. You can really put it on this way, coating every lash fast!


17. Secret Eye Lift

Sweep a light pink matte pencil across the entire length of your brow bone to create the illusion of a higher arch, and then blend, blend, blend! It should not be detectable.


18. Proper Contouring

When applied right, contouring can define your cheekbones and jaw line, reduce the look of a double chin, minimize a larger nose, and lift sagging eyes. It’s basically using makeup to highlight and accentuate your features. This is especially important for photos, as the camera tends to pick up shadows and highlights better than the naked eye.
There are actual contouring and highlighting powders made just for this, but you can also use a bronzer or powder that is a few shades darker than your skin, and a foundation that is a few shades lighter for highlighting. For the most part, your t-zone and under eye area is where you want to highlight, and the outer portion of your face, underneath your cheekbones, and your neck is where you want to define with a darker color. Keep in mind, blending is key for a natural look! This may take some practice at first.


19. The Line Saver

I’m always having to check my eyeliner because sometimes it starts to stray from where it was placed, especially in the summer months. Certain eyeliners are more prone to this, especially those that aren’t water proof, but I don’t like using waterproof makeup because it’s so darn hard to get off! I always feel like I’m ripping my lashes off in the removal process. To keep your liner behaving, sweep loose or pressed powder right underneath the eyeliner on your bottom lid. It creates somewhat of a barrier, preventing your eyeliner from traveling downward.


20. The Lip Cheat

As it turns out, we weren’t all blessed with Angelina Jolie’s lush lips. Now, there are a few tricks to making them appear larger (a glossy lip being one), but for a more dramatic effect, don’t be afraid to line your lips just outside of your natural line. When I say just outside of your natural line, I mean slightly. You don’t want to look like a clown by over doing it!


21. Downward Strokes

Although you want to wash your face and apply your moisturizer with upwards strokes to help lessen fine lines and a sagging face, the opposite is true for foundation and powder. Most of us have a little bit of hair on our face, and it tends to grow downwards. If you apply your makeup with upward strokes, it will cause your “peach fuzz” to stick strait up, making it more noticeable.


22. Eyebrows & Face Shape

A lot of us ignore our eyebrows (or have over plucked them into non-existence) not realizing how important they are in defining our face. There isn’t one shape that is the best, it really just depends on your unique facial features and shape. Just like contouring, your eyebrow shape and thickness can help soften your face shape.


23. DIY Tinted Moisturizer

This works just as well as a B&B cream, hiding imperfections with a really natural look; simply mix your favorite facial moisturizer with a little bit of concealer. This way you can customize it with just the right amount of coverage.


24. Instant Eye Lift

This quick and easy illusion will give you an instant eye life. Draw an arch directly above your eyebrow with your favorite highlighter, and blend with your finger. This makes your arch look raised, making the whole eye area look like it has been lifted.


25. Wash & Save Your Wands

Instead of tossing them in the trash when your mascara expires, wash and repurpose those wands! You can use them as an eyebrow brush, even applying a bit of color before sweeping across your brows. Or, spray with hairspray and use them to brush and keep your eyebrows in place.


26. Clump-Free Lashes

It may seem like a waste, but if you want clump-free lashes (so hard to achieve, right?!) , you have to wipe your mascara wand off on a tissue before each application. This way you can apply several coats seamlessly.


27. Blemish Secret

Instead of using that bulky tube of concealer to cover your blemishes, rub a bit of it on an eyeliner brush (or any slender brush) for more precise control. Don’t forget to blend the edges with your finger!


28. Soften The Line

Although I like liquid liner and its ability to really define the eyes, I’m not really a fan of the harshness of it. And, if it’s not applied perfectly, imperfections really stand out. To soften the look, sweep a metallic brown shadow over the liner. This not only diminishes the hard-line, but also helps hide imperfections.


29. Make It Last

Keep those lips kissable by sealing the deal. After your lipstick is applied, hold a tissue over your lips and apply powder over the tissue. This creates a matte look that lasts much longer.


30. False Eyelash 101

If you’ve ever attempted this beauty-aid, you know that it can be quite trying! But, false eye lashes can bring your look from drab to fab in just a few patient minutes, and is definitely worth the time for special occasions. The key is knowing how to apply them from the get-go, otherwise your frustration will prevail.


31. The 3-D Lip Effect

So simple and stunning! Use your finger to stamp a little bit of frosted blush or eye shadow to the center of your bottom and top lip.


32. When To Toss It Out

As much money as we spend on our beauty products, it’s hard to let it go, but at some point your makeup becomes unhealthy for your skin and eyes. This is especially true for anything that gets applied around your eyes, so it’s important to give your makeup drawer a good clean out every once in a while.